

Using AWS Glue Jobs with Terraform
Discover how AWS Glue Jobs quietly binds your data journey with the agility of serverless Spark

The road so far… *Carry on, my wayward son is playing in my mind*. In a previous post, we saw Amazon Athena and how to query data, such as CUR reports. Amazon Athena is a fantastic tool provided by AWS, a serverless managed Presto that allows you to query your unstructured and semi-structured data at a very low cost. In this post, we will continue our journey to the AWS Data Stack and see the famous Glue Jobs in practice by converting CSV files to Parquet.
We will use the following services with Terraform, where the majority of those are from Terraform AWS Modules:
Amazon S3: for storing our raw and processed data
AWS Glue:
Glue Job: For processing files
Glue Crawler for cataloging the data
Step-function: For executing the whole workflow
Lambda: For triggering the step function upon file upload in the S3 bucket
This is a Level 200 post; following along with the post and deploying the infrastructure to your AWS account will cost approximately ~$1.5 per month, given you run ~10 times a month, the Glue job and the Crawler. You can follow along with the code in my repo.
What is AWS Glue
AWS Glue is a fully managed, serverless data integration service that eliminates the complexity of building and managing data infrastructure. It automatically provisions, scales, and manages the compute resources needed for your data workloads, allowing you to focus on extracting value from your data rather than managing servers.
🕷️ Crawlers - Automatically discover and catalog your data across various sources (S3, databases, data lakes), inferring schemas and populating metadata without manual intervention.
📚 Data Catalog - A centralized metadata repository that is a persistent store for table definitions, schema information, and data location details, making your data discoverable and queryable.
⚙️ Jobs - Serverless ETL (Extract, Transform, Load) and ELT workflows that process your data using familiar programming languages like Python and Scala, with built-in monitoring and error handling.
What You'll Learn
In this post, you'll build an automated AWS Glue ETL pipeline that transforms CSV files to Parquet format and catalogs them for analytics.
Key takeaways:
Glue Jobs - Create serverless ETL scripts and use Glue Jobs to process your data
Glue Crawlers - Set up automatic schema discovery and data cataloging for your processed datasets
Event-Driven Processing - Trigger Glue jobs automatically when new files arrive in S3, creating a seamless data ingestion pipeline
Serverless Spark - Leverage AWS Glue's managed Spark environment for scalable data transformations without cluster management
Setting the Stage - Terraform
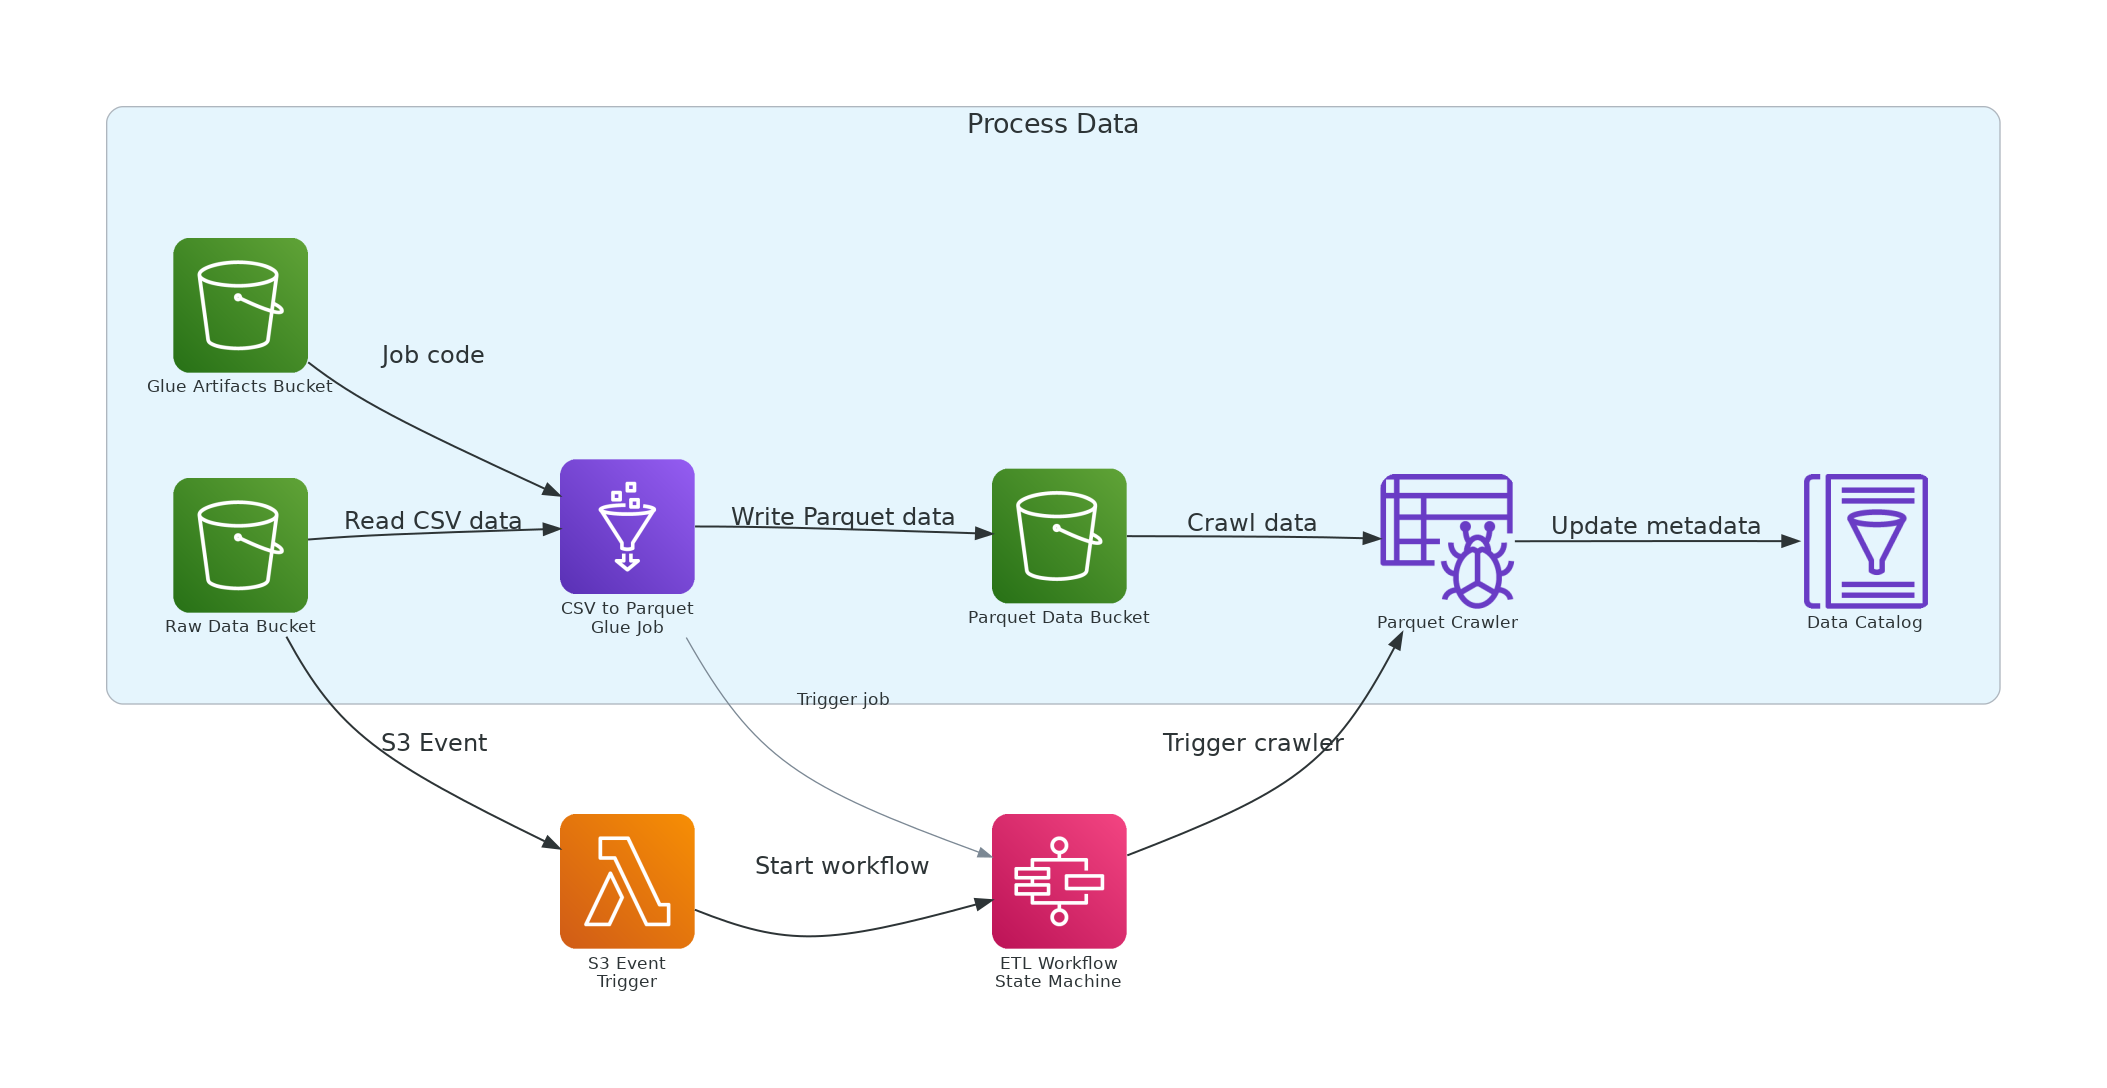
As we can see in the Diagram above, we are going to use Glue Jobs to convert a file from CSV to Parquet. You can replace the Glue code with whatever you like; I am just using this example to showcase the Job.
We will start by creating the buckets for our use case. File: s3.tf. We have created multiple buckets using Anton’s module, so I will only show you the definition of the RAW bucket. Most importantly, I will later show you how to create the trigger.
module "raw_bucket" {
  source  = "terraform-aws-modules/s3-bucket/aws"
  version = "~> 4.8"

  bucket = "${local.project_name}-raw-data-${local.environment}"

  force_destroy = true
  acl           = "private"

  # Add ownership controls
  control_object_ownership = true
  object_ownership         = "ObjectWriter"


  tags = local.tags
}
Now, let’s create our Glue Job, which will take the files from the raw bucket and place them as Parquet in a processed bucket. File: glue.tf
# Upload the Glue job script to S3
resource "aws_s3_object" "glue_job_script" {
  bucket = module.artifacts_bucket.s3_bucket_id
  key    = "scripts/csv_to_parquet.py"
  source = "${path.module}/scripts/csv_to_parquet.py"
  etag   = filemd5("${path.module}/scripts/csv_to_parquet.py")
}

# Glue job definition
resource "aws_glue_job" "csv_to_parquet" {
  depends_on = [aws_s3_object.glue_job_script]
  name       = "${local.project_name}-csv-to-parquet"
  role_arn   = aws_iam_role.glue_job_role.arn

  command {
    name            = "glueetl"
    script_location = "s3://${module.artifacts_bucket.s3_bucket_id}/${aws_s3_object.glue_job_script.key}"
    python_version  = "3"
  }

  default_arguments = {
    "--job-language"                     = "python"
    "--job-bookmark-option"              = "job-bookmark-enable"
    "--enable-metrics"                   = "true"
    "--enable-continuous-cloudwatch-log" = "true"
    "--TempDir"                          = "s3://${module.parquet_bucket.s3_bucket_id}/temp/"
    "--input_path"  = "s3://${module.raw_bucket.s3_bucket_id}/input/"
    "--output_path" = "s3://${module.parquet_bucket.s3_bucket_id}/data/"
  }

  execution_property {
    max_concurrent_runs = 1
  }

  glue_version      = "5.0"
  worker_type       = "G.1X"
  number_of_workers = 2
  timeout           = 10 # minutes
}
A lot to digest here 😅, let’s go line by line and see the configuration of our crawler.
resource "aws_s3_object" "glue_job_script" {
  bucket = module.artifacts_bucket.s3_bucket_id
  key    = "scripts/csv_to_parquet.py"
  source = "${path.module}/scripts/csv_to_parquet.py"
  etag   = filemd5("${path.module}/scripts/csv_to_parquet.py")
}
This is to upload the script that Glue will run, in this script I have used both Spark and GlueSpark context.
command {
    name            = "glueetl"
    script_location = "s3://${module.artifacts_bucket.s3_bucket_id}/${aws_s3_object.glue_job_script.key}"
    python_version  = "3"
}
Let’s define the execution environment and script location. We specify where Glue can find the script and what the Python version is
default_arguments = {
    "--job-language"                     = "python"
    "--job-bookmark-option"              = "job-bookmark-enable"
    "--enable-metrics"                   = "true"
    "--enable-continuous-cloudwatch-log" = "true"
    "--TempDir"                          = "s3://${module.parquet_bucket.s3_bucket_id}/temp/"
    "--input_path"  = "s3://${module.raw_bucket.s3_bucket_id}/input/"
    "--output_path" = "s3://${module.parquet_bucket.s3_bucket_id}/data/"
}
Now for the job behavior and data flow paths. We set up the observability features for logging and enable bookmarks. Last but not least, we define the locations we need to interact with our files.
execution_property {
  max_concurrent_runs = 1
}
This prevents the same job from running multiple times. You can set this to whatever value you need; I’ve used 1 to ensure the cost estimate above is accurate.
glue_version      = "5.0"
worker_type       = "G.1X"
number_of_workers = 2
timeout           = 10 # minutes
We define the compute environment and resource allocation where we set the Glue runtime version (determines Spark version, features available), the allocated compute resources (worker type and count), and some safety limits (timeout) to prevent runaway costs.
After the Glue Job, we create a Glue Crawler to catalog our data from the destination bucket. You can find the definition here; no need to describe this again, since we have seen it multiple times in our previous posts.
Now we need to define our Step Function. It will operate as shown in the definition below.
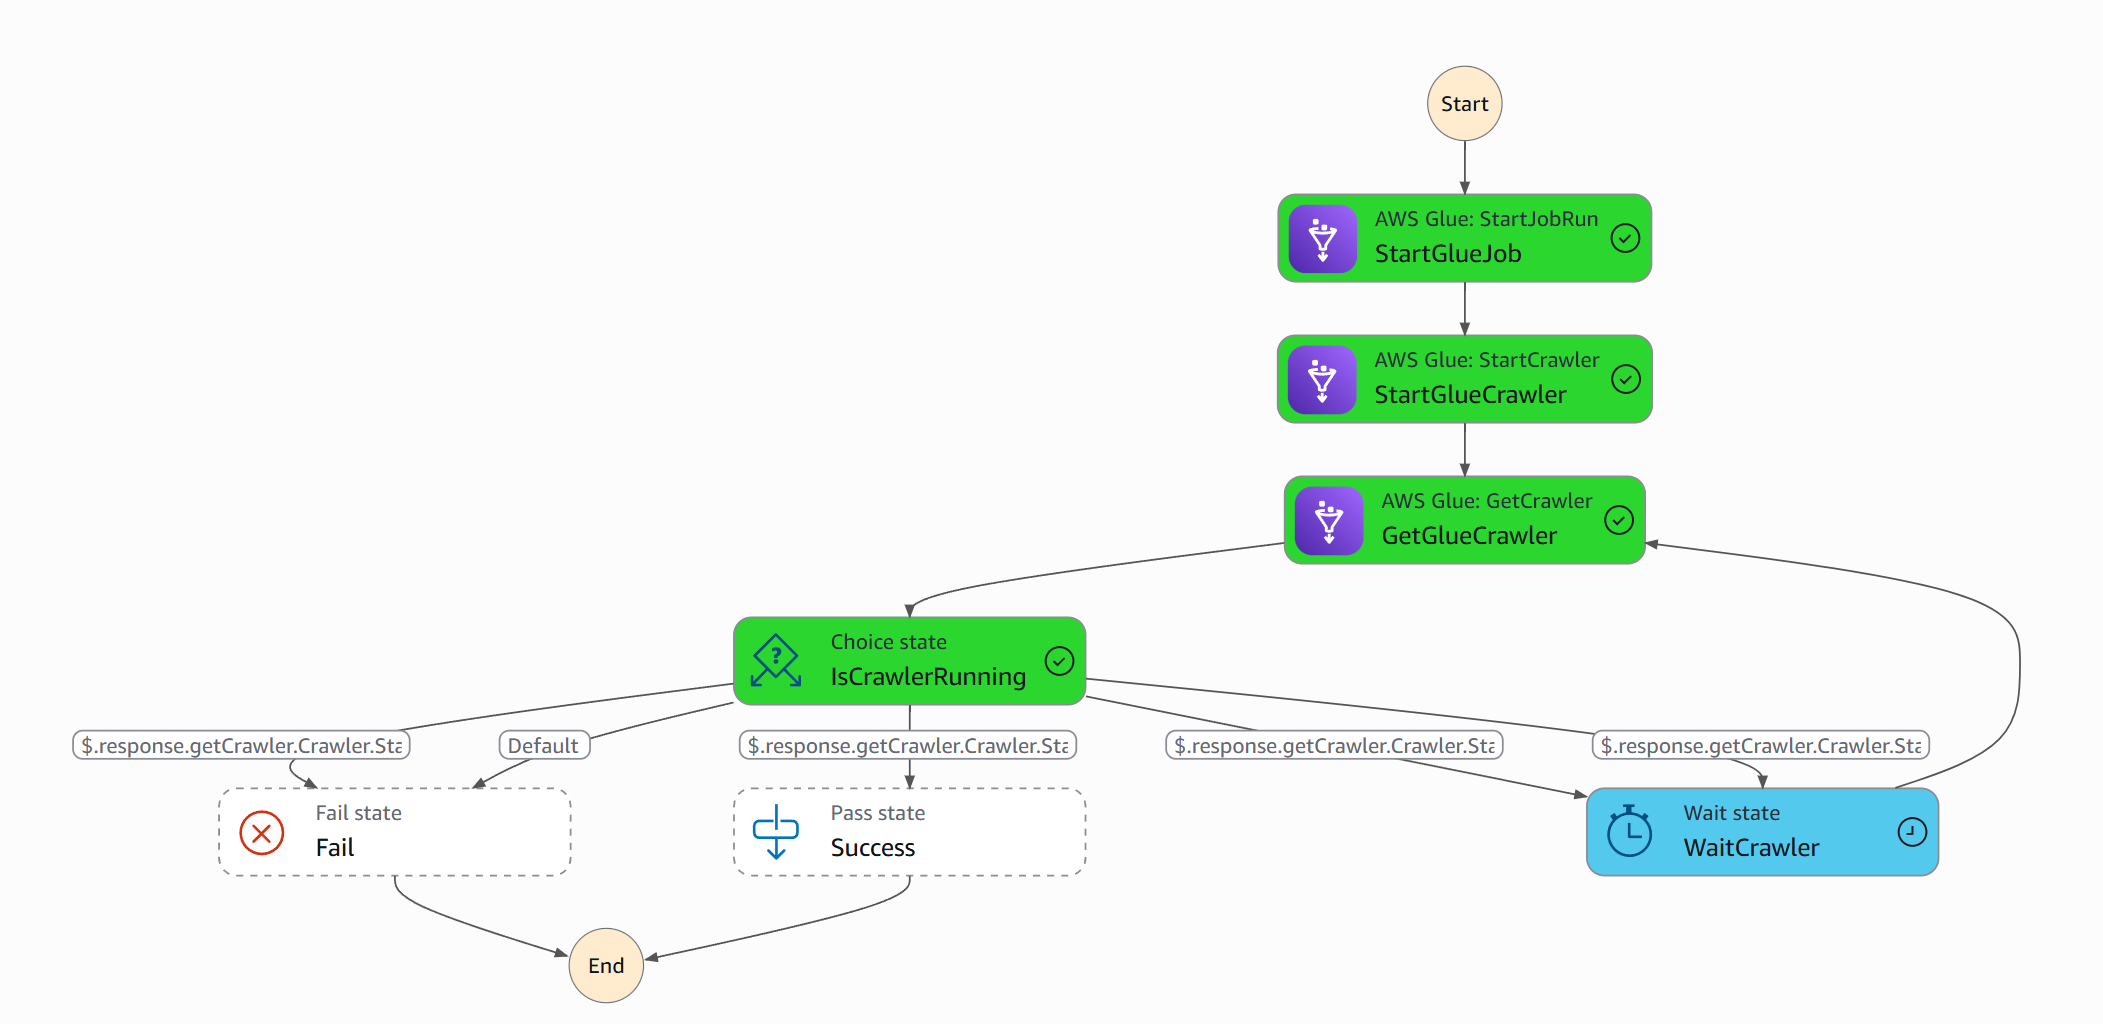
Feel free to copy the definition from here. File: state_machine.tf
# Step Functions state machine definition
module "etl_state_machine" {
  source  = "terraform-aws-modules/step-functions/aws"
  version = "~> 4.2.1"

  name = "${local.project_name}-etl-workflow"

  attach_policy_json = true
  policy_json        = data.aws_iam_policy_document.step_functions_glue_policy.json

  definition = jsonencode({
    Comment = "ETL workflow to process CSV to Parquet and crawl the data",
    StartAt = "StartGlueJob",
    States = {
      "StartGlueJob" = {
        Type     = "Task",
        Resource = "arn:aws:states:::glue:startJobRun.sync",
        Parameters = {
          JobName = aws_glue_job.csv_to_parquet.name,
          Arguments = {
            "--input_path.$"  = "$.input_path",
            "--output_path.$" = "$.output_path"
          }
        },
        ResultPath = "$.glueJobResult",
        Next       = "StartGlueCrawler"
      },
      ...
      "Success" = {
        Type = "Pass",
        End  = true
      }
    }
  })
}
Let’s see now how we create the trigger along with the Lambda. The Lambda will be Dockerized. File lambda.tf This is the Lambda that will trigger the step function above.
We first define the Docker image and Registry.
# ECR Docker image for Lambda
module "docker_image" {
  source = "terraform-aws-modules/lambda/aws//modules/docker-build"

  ecr_repo = module.ecr.repository_name
  # image_tag       = "latest"
  source_path = "${path.module}/lambdas"

  # cache_from = ["${module.ecr.repository_url}:latest"]
  # Use the pre-built image from ECR
  use_image_tag = true
}

module "ecr" {
  source = "terraform-aws-modules/ecr/aws"

  repository_name         = "${local.project_name}-ecr"
  repository_force_delete = true

  create_lifecycle_policy = false

  repository_lambda_read_access_arns = [module.trigger_step_function.lambda_function_arn]
}
Then we create the Lambda.
module "trigger_step_function" {
  source  = "terraform-aws-modules/lambda/aws"
  version = "~> 7.20"

  function_name = "${local.project_name}-trigger-step-function"
  description   = "Lambda function to trigger Step Function when a file is uploaded to S3"

  # Docker image config
  create_package = false
  image_uri      = module.docker_image.image_uri
  package_type   = "Image"

  # Lambda settings
  timeout     = 300
  memory_size = 512

  # Environment variables
  environment_variables = {
    GLUE_JOB_NAME     = aws_glue_job.csv_to_parquet.name
    OUTPUT_BUCKET     = module.parquet_bucket.s3_bucket_id
    STATE_MACHINE_ARN = module.etl_state_machine.state_machine_arn
  }

  image_config_command = ["trigger_step_function.handler"]

  # IAM policy statements
  attach_policies = true
  policies = [
    "arn:aws:iam::aws:policy/service-role/AWSLambdaBasicExecutionRole",
    aws_iam_policy.lambda_glue_access.arn,
    aws_iam_policy.lambda_step_functions_policy.arn
  ]
  number_of_policies = 3

  tags = local.tags
}
Last but not least, we create the notification from the bucket we have created above.
# S3 event notification to trigger Lambda
resource "aws_s3_bucket_notification" "bucket_notification" {
  bucket = module.raw_bucket.s3_bucket_id

  lambda_function {
    lambda_function_arn = module.trigger_step_function.lambda_function_arn
    events              = ["s3:ObjectCreated:*"]
    filter_prefix       = "input/"
    filter_suffix       = ".csv"
  }

  depends_on = [aws_lambda_permission.allow_bucket]
}

# Permission for S3 to invoke Lambda
resource "aws_lambda_permission" "allow_bucket" {
  statement_id  = "AllowExecutionFromS3Bucket"
  action        = "lambda:InvokeFunction"
  function_name = module.trigger_step_function.lambda_function_arn
  principal     = "s3.amazonaws.com"
  source_arn    = "arn:aws:s3:::${module.raw_bucket.s3_bucket_id}"
}
You can edit your deployment by configuring the variables in locals.tf. Additional files, not included in the post, are:
iam.tf: to define the IAM access of our resources
trigger_step_function.py: the Lambda code
Dockerfile: the Lambda Image
And that’s it. You are now ready to deploy the infrastructure.
terraform planand once we validate the plan, we can run
terraform applyUsing Glue Jobs
How Glue Jobs Execute Spark Code Serverlessly
AWS Glue Jobs provide a serverless Apache Spark environment that automatically provisions the exact compute resources you need, executes your PySpark transformations across distributed workers, and cleans up when complete. You simply upload your script to S3 and define job parameters - AWS handles cluster management, scaling, and infrastructure entirely behind the scenes, charging you only for actual compute time used.
Job Configuration Essentials
Data Processing Units (DPUs) are the core compute building blocks, where each DPU provides 4 vCPUs and 16 GB of RAM. You can choose from different worker types (Standard, G.1X, G.2X) and scale from 2 to 100 DPUs based on your data volume. Job bookmarks intelligently track what data has been processed to avoid reprocessing on subsequent runs - essential for incremental data pipelines. Retry mechanisms and timeout controls provide operational safety, while custom arguments let you parameterize your jobs for different environments and datasets.
Conclusion
AWS Glue transforms what once required complex cluster management, infrastructure planning, and operational overhead into a simple, declarative experience.
It is a very powerful tool to know, but it still has its limits. You need to evaluate and validate your configuration carefully.
To destroy what we have created today, simply run
terraform destroy Feel free to reach out if you encounter any problems or have suggestions.
Till the next time, stay safe and have fun! ❤️