

Learning ECS the fun way ~ Hosting a Minecraft Server
How to host a Minecraft Server on ECS using Terraform

In this post, I will create a Minecraft server, but not from a paid service that provides servers, not locally on my computer, and certainly not by hand in a virtual machine. I will try to create the server using Infrastructure as Code and a Cloud provider.
The purpose of this blog post is to showcase some capabilities of AWS ECS and Terraform modules, and by doing so, why not end up with a functional Vanilla Minecraft server way overpriced, where we can also play 😁
Disclaimer: While coming from an FPS background as a kid, I chose Minecraft for two reasons: first, it is one of the greatest games, and second, I play with my daughter.
What You’ll Learn
We are going to take a look at the following:
Basics of ECS (Fargate, Task Definition, Services)
Configuring our container in ECS
Utilizing Terraform modules1 (not resources) by Anton Babenko
Deploying our IaC in Terraform
This is a Level 200 difficulty, meaning you will need to know some basic concepts of AWS, Docker, and VPCs
You will need the following:
An AWS Account and access to credentials of your AWS (either a service account or configure SSO)
Setting the Stage
This is the architecture we are going to implement
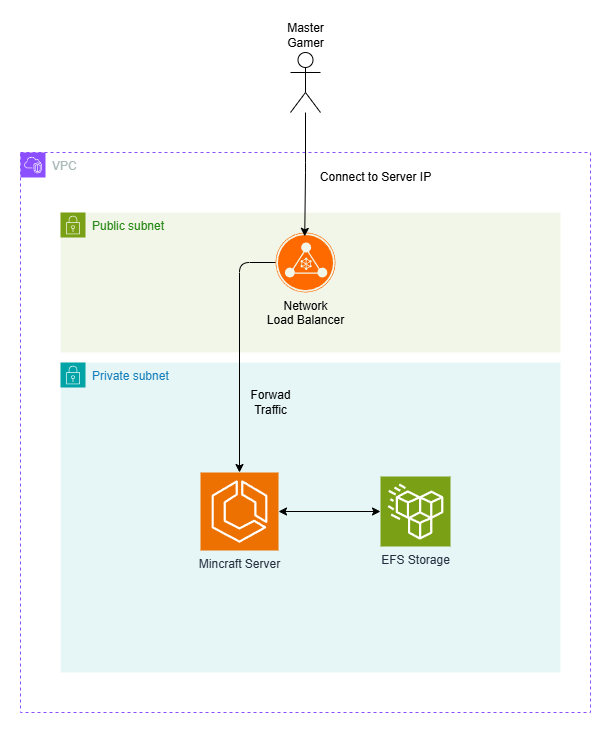
As shown above, we have created a VPC with both public and private subnets. We have placed our Network Load Balancer in the public subnets, and in the private subnet, we have our Minecraft server and the EFS storage (a type of persistent storage).
This will cost approximately 65$ per month! 😨😨Obviously, we can reduce the cost to 25$ per month, but we are not trying to make a cheap Minecraft server, we are trying to learn ECS and how it works!
The full code for this project is in this GitHub Repo. I have parameterized the infrastructure and added some locals in the file locals.tf.
Terraform into play
DISCLAIMER: I will explain the different modules I have used; however, for a complete example, please visit the GitHub repository. Files are missing, like
locals.tf
data.tf
etc
We first start by creating a VPC for our server. We are using this module.
module "vpc" {
  source  = "terraform-aws-modules/vpc/aws"
  version = "~> 5.19.0"

  name = "minecraft-vpc"
  cidr = local.cidr

  azs             = local.azs
  private_subnets = local.private_subnets
  public_subnets  = local.public_subnets

  # Enable NAT Gateway for private subnets
  enable_nat_gateway = true
  single_nat_gateway = true # Use a single NAT Gateway to save costs

  tags = {
    Terraform   = "true"
    Environment = "dev"
  }
}
With the code above, we create a VPC with two private and two public subnets spanning two availability zones. Additionally, we enable the NAT gateway because we are going to place our container in the private subnet, and it will need access to the internet in order to download the Minecraft Docker image.
Once we have the VPC in place, we will need to add the EFS (Elastic File Storage) for persistent storage. We will use this module.
module "efs" {
  source  = "terraform-aws-modules/efs/aws"
  version = "~> 1.8"

  # File system
  name           = "minecraft-volume"
  creation_token = "minecraft-volume"
  encrypted      = true
  kms_key_arn    = module.kms.key_arn

  # File system policy
  attach_policy                      = true
  bypass_policy_lockout_safety_check = false

  # policy statements will be added after the ECS Service
  # <THIS IS WHERE WE WILL PUT LATER THE STATEMENT>

  # Mount targets / security group
  mount_targets              = { for k, v in zipmap(module.vpc.azs, module.vpc.private_subnets) : k => { subnet_id = v } }
  security_group_description = "EFS security group for minecraft server"
  security_group_vpc_id      = module.vpc.vpc_id

  security_group_rules = {
    vpc = {
      # relying on the defaults provided for EFS/NFS (2049/TCP + ingress)
      description = "NFS ingress from VPC private subnets"
      cidr_blocks = module.vpc.private_subnets_cidr_blocks
    }
  }

  access_points = {
    vanilla_minecraft = {
      posix_user = {
        gid = 1000
        uid = 1000
      }
      root_directory = {
        path = "/vanilla"
        creation_info = {
          owner_gid   = 1000
          owner_uid   = 1000
          permissions = "755"
        }
      }
    }
  }

  # Backup policy
  enable_backup_policy = false
  # Replication configuration
  create_replication_configuration = false

  tags = {
    Terraform   = "true"
    Environment = "dev"
  }
}


module "kms" {
  source  = "terraform-aws-modules/kms/aws"
  version = "~> 1.0"

  aliases               = ["efs/minecraft-volume"]
  description           = "EFS customer managed key"
  enable_default_policy = true
}
In the code above, we are creating our EFS. First of all, we are encrypting our storage, not that we need to for a personal Minecraft server, but again, we are here to learn. We have omitted the policy statements for now, as the ECS task has not been created yet. We create the mount targets in our private subnets to allow us to attach EFS to resources existing in the private subnets, then we create the security group rules. Lastly, we create the access points for the folder where Minecraft will store its data. You do not necessarily need the access point, but by doing so, you can create multiple servers within the same cluster, all of which use the same EFS filesystem (spoilers).
Now that we have our EFS, we will need to create the Network Load Balancer to forward the traffic to our ECS. We are using this module.
 module "nlb" {
  source  = "terraform-aws-modules/alb/aws"
  version = "~> 9.16"

  name = "minecraft-nlb"

  load_balancer_type = "network"

  vpc_id                     = module.vpc.vpc_id
  subnets                    = module.vpc.public_subnets
  enable_deletion_protection = false
  create_security_group      = false
  security_groups            = [aws_security_group.nlb.id]

  listeners = {
    minecraft = {
      port     = local.container_port
      protocol = "TCP"
      forward = {
        target_group_key = "minecraft-vanilla"
      }
    }
  }

  target_groups = {
    minecraft-vanilla = {
      name              = "minecraft-vanilla"
      protocol          = "TCP"
      port              = local.container_port
      target_type       = "ip"
      create_attachment = false
      health_check = {
        enabled             = true
        interval            = 30
        healthy_threshold   = 3
        unhealthy_threshold = 3
        protocol            = "TCP"
        timeout             = 10
      }
    }
  }


  tags = {
    Environment = "Development"
    Project     = "Example"
  }
}

resource "aws_security_group" "nlb" {
  name        = "minecraft-nlb-sg"
  description = "Security group for Minecraft NLB"
  vpc_id      = module.vpc.vpc_id

  ingress {
    from_port   = local.container_port
    to_port     = local.container_port
    protocol    = "tcp"
    cidr_blocks = ["0.0.0.0/0"]
    description = "Minecraft server port"
  }

  egress {
    from_port   = local.container_port
    to_port     = local.container_port
    protocol    = "tcp"
    description = "Minecraft port to VPC"
    cidr_blocks = [module.vpc.vpc_cidr_block]
  }

  tags = {
    Name        = "minecraft-nlb-sg"
    Environment = "Development"
    Project     = "Example"
  }
}
This is a very straightforward approach. We create a network load balancer in the public subnets and attach a security group that allows all connections from anywhere to the Minecraft server port. We then forward these connections to resources only within our VPC. Then, we create the listener and a target group. This target group will be connected to the ECS module.
Now, the final part, let’s create the ECS Cluster with our Minecraft server! 💪We are going to use this module.
module "ecs" {
  source  = "terraform-aws-modules/ecs/aws"
  version = "~> 5.12"

  cluster_name = "minecraft-servers"

  cluster_configuration = {
    execute_command_configuration = {
      logging = "OVERRIDE"
      log_configuration = {
        cloud_watch_log_group_name = "/aws/ecs/minecraft-servers"
      }
    }
  }

  fargate_capacity_providers = {
    FARGATE_SPOT = {
      default_capacity_provider_strategy = {
        weight = 100
      }
    }
  }

  services = {
    minecraft-vanilla = {
      cpu    = 4096
      memory = 8192

      volume = [
        {
          name = "minecraft-storage"

          efs_volume_configuration = {
            file_system_id     = module.efs.id
            transit_encryption = "ENABLED"
            root_directory     = "/"
            authorization_config = {
              iam             = "ENABLED"
              access_point_id = module.efs.access_points["vanilla_minecraft"].id
            }
          }
        }
      ]

      # Move to private subnets and remove public IP
      assign_public_ip = false
      subnet_ids       = module.vpc.private_subnets

      # Configure load balancer
      load_balancer = {
        service = {
          target_group_arn = module.nlb.target_groups["minecraft-vanilla"].arn
          container_name   = "minecraft-vanilla-task"
          container_port   = local.container_port
        }
      }

      # Use the dedicated security group
      security_group_ids = [aws_security_group.ecs_service.id]

      # add access to EFS and KMS in the task role
      tasks_iam_role_policies = {
        efs_access = aws_iam_policy.efs_access_policy.arn
        kms_access = aws_iam_policy.efs_kms_access_policy.arn
        ssm_access = aws_iam_policy.ssm_session_manager_policy.arn
      }

      # Container definition(s)
      container_definitions = {

        minecraft-vanilla-task = {
          cpu    = 4096
          memory = 8192
          image  = "itzg/minecraft-server"

          port_mappings = [
            {
              name          = "minecraft-vanilla-container"
              containerPort = local.container_port
              hostPort      = local.container_port
              protocol      = "tcp"
            }
          ]

          environment = [
            {
              name  = "EULA"
              value = "TRUE"
            },
            {
              name  = "WHITELIST"
              value = local.whitelist_list
            },
            {
              name  = "DIFFICULTY"
              value = local.difficulty
            }
          ]

          mount_points = [
            {
              sourceVolume  = "minecraft-storage"
              containerPath = "/data"
              readOnly      = false
            }
          ]

          # Example image used requires access to write to root filesystem
          readonly_root_filesystem = false
          memory_reservation       = 100

          # Enable SSM Session Manager
          enable_execute_command = true
        }
      }

    }
  }


  # Create task execution role and attach policies for EFS  create_task_exec_iam_role = true
  create_task_exec_iam_role = true
  task_exec_iam_role_name   = "minecraft-exec-role"
  task_exec_iam_role_policies = {
    efs_access = aws_iam_policy.efs_access_policy.arn
    kms_access = aws_iam_policy.efs_kms_access_policy.arn
  }

  tags = {
    Environment = "Development"
    Project     = "Example"
  }
}

# Create a dedicated security group for the ECS service
resource "aws_security_group" "ecs_service" {
  name        = "minecraft-ecs-service-sg"
  description = "Security group for Minecraft ECS service"
  vpc_id      = module.vpc.vpc_id

  ingress {
    from_port       = local.container_port
    to_port         = local.container_port
    protocol        = "tcp"
    description     = "Minecraft port from NLB"
    security_groups = [aws_security_group.nlb.id]
  }

  ingress {
    from_port       = 2049
    to_port         = 2049
    protocol        = "tcp"
    description     = "NFS Port"
    security_groups = [module.efs.security_group_id]
  }

  egress {
    from_port       = local.container_port
    to_port         = local.container_port
    protocol        = "tcp"
    description     = "Minecraft port to NLB"
    security_groups = [aws_security_group.nlb.id]
  }

  egress {
    from_port       = 2049
    to_port         = 2049
    protocol        = "tcp"
    description     = "NFS Port"
    security_groups = [module.efs.security_group_id]
  }

  egress {
    from_port   = 443
    to_port     = 443
    protocol    = "tcp"
    description = "SSM Session Manager"
    cidr_blocks = ["0.0.0.0/0"] # SSM endpoints are AWS managed
  }

  tags = {
    Name        = "minecraft-ecs-service-sg"
    Environment = "Development"
    Project     = "Example"
  }
}
The above code may seem intimidating, but once we go through it, it will become clearer. Let’s dive in.
First, we define the logs and the capacity providers for our cluster. We select FARGATE_SPOT to save a few bucks and because we can afford some outage. If you run business-critical applications that are not self-healing and resumable, use FARGATE.
Then, we define our service where our Minecraft docker instance will run. We set the CPU and RAM available for this service, and we define the attachment to our EFS. Now, once the service is deployed, it will fail. We will need to add the policy to our EFS (remember the comment on the EFS module). "
volume = [
        {
          name = "minecraft-storage"

          efs_volume_configuration = {
            file_system_id     = module.efs.id
            transit_encryption = "ENABLED"
            root_directory     = "/"
            authorization_config = {
              iam             = "ENABLED"
              access_point_id = module.efs.access_points["vanilla_minecraft"].id
            }
          }
        }
      ]
We disable public access to the service, which is why we have the NLB, and we also place everything that will be spawned within the service in private subnets.
assign_public_ip = false
subnet_ids       = module.vpc.private_subnets
We attach the load balancer to our service and ensure that we reference the target group and the container to which we will forward the traffic.
load_balancer = {
  service = {
    target_group_arn = module.nlb.target_groups["minecraft-vanilla"].arn
    container_name   = "minecraft-vanilla-task"
    container_port   = local.container_port
  }
}
Lastly, for the service, we will define the policies and security groups. You can find the IAM roles here in the iam.tf file. The security group is mentioned at the end.
# Use the dedicated security group
security_group_ids = [aws_security_group.ecs_service.id]

# add access to EFS and KMS in the task role
tasks_iam_role_policies = {
  efs_access = aws_iam_policy.efs_access_policy.arn
  kms_access = aws_iam_policy.efs_kms_access_policy.arn
  ssm_access = aws_iam_policy.ssm_session_manager_policy.arn
}
Now let’s move to the container definitions. We create our container with the name minecraft-vanilla-task, set up the port mappings, image, and CPU and RAM
minecraft-vanilla-task = {
  cpu    = 4096
  memory = 8192
  image  = "itzg/minecraft-server"

  port_mappings = [
    {
      name          = "minecraft-vanilla-container"
      containerPort = local.container_port
      hostPort      = local.container_port
      protocol      = "tcp"
    }
  ]
...
Then, the environment variables, mount points to our EFS, and we also enable the execute command, in case we get stuck in a cave mining nearly dead 😉
...
environment = [
  {
    name  = "EULA"
    value = "TRUE"
  },
  {
    name  = "WHITELIST"
    value = local.whitelist_list
  },
  {
    name  = "DIFFICULTY"
    value = local.difficulty
  }
]

mount_points = [
  {
    sourceVolume  = "minecraft-storage"
    containerPath = "/data"
    readOnly      = false
  }
]

# Example image used requires access to write to root filesystem
readonly_root_filesystem = false
memory_reservation       = 100

# Enable SSM Session Manager
enable_execute_command = true
Now that we are done with the container definitions, we set up the task execution role, so our container will have access to the EFS and the encryption key.
 create_task_exec_iam_role = true
  task_exec_iam_role_name   = "minecraft-exec-role"
  task_exec_iam_role_policies = {
    efs_access = aws_iam_policy.efs_access_policy.arn
    kms_access = aws_iam_policy.efs_kms_access_policy.arn
  }
And that is all! 🎉🎉🎉
Let’s deploy this thing now.
Deploy and Test
I assume you already have Terraform installed and connected to your AWS account.
First, we run init to load our modules
terraform initThen we plan and see what it will be created
terraform planThen we deploy
terraform applyOnce everything is deployed, we will need to add the policy to our EFS module.
policy_statements = [
    {
      sid = "Example"
      actions = [
        "elasticfilesystem:ClientMount",
        "elasticfilesystem:ClientWrite",
        "elasticfilesystem:ClientRootAccess",
        "elasticfilesystem:DescribeFileSystems"
      ]
      principals = [
        {
          type        = "AWS"
          identifiers = [module.ecs.task_exec_iam_role_arn]
        }
      ]
    }
  ]
And then deploy again.
By that point, you should have everything provisioned, with your service running smoothly and healthily.

Log in to your AWS account and go to the ECS service to check your cluster.
If everything is healthy, you can run this command from your terminal (AWS CLI command that requires logging in to AWS via the CLI) to get the public DNS of your NLB.
aws elbv2 describe-load-balancers --names minecraft-nlb --query 'LoadBalancers[0].DNSName' --output textOr, you can go to the EC2 service, search for the load balancer, and get it from there.
Now the only thing left is to spin up your Minecraft and connect to the server by providing the NLB DNS.
🎉Congratulations!🎉
You have a working Minecraft server, which is way overcomplicated and way more expensive, but you learned ECS along the way!
Clean up
DO NOT FORGET TO CLEAN UP YOUR ENVIRONMENT!!! It is expensive!
Run the command:
terraform destroyWhat comes next?
Since this is an expensive solution, I would like to create a mechanism that allows me to open and close the Minecraft server on demand. In the future, I will place the Minecraft server on public subnets to avoid the NAT gateway cost and create a hosted zone for my vanilla Minecraft server.
Feel free to reach out if you encounter any problems or have suggestions.
Till the next time, stay safe and have fun!
Appendix
https://github.com/terraform-aws-modules
I have corrected some mistakes in the post, i.e. 200$ was way too expensive :P
I have also created a budget version, around 25$ if you want to flex and host Minecraft on ECS.
Github: https://github.com/siakon89/minecraft-server/tree/budget-server
To drive down operational costs even more replace the NLB with an elastic IP, associate it to the EC2 instance hosting the task.
Also, if you are ok with having 1 instance of the task at any given moment (no auto-scaling, blue/green deployments) replace the EFS with an EBS volume. EFS is a very expensive storage option.
Otherwise, nice article. Look forward to seeing more of your writings.