In today’s post, we are going to take a look at another AI service of AWS, Amazon Rekognition. We focus on the image for object and scene detection, and we learn how to use the service programmatically.
Furthermore, you can also check out one of my previous posts about another AI Service, Amazon Kendra. Kendra is a service that lets you build your search engine.
This tutorial has a 200 difficulty score, and we will spend:
- Total Cost: 0$. Amazon Rekognition has a free tier for the first 12 months and allows you to analyze 5000 images per month. -> https://aws.amazon.com/rekognition/pricing/
- If not in Free-tier, it is 0.0012 per image for the first 1M images. We will test 10 images: 10 * 0.0012 = 0.012$
You can find the code for this post here. You should also check out the resources at the end of the article, there is some handy link there.
Prerequisites
First of all, before we begin with the hands-on, please make sure you have the following:
- Python 3: https://wiki.python.org/moin/BeginnersGuide/Download. In my examples, I use Python 3.6.
- Boto3: https://pypi.org/project/boto3/
- An active AWS account: https://aws.amazon.com/
Once you have everything ready, we can move on to the next section.
Setting up a user for AWS
Secondly, after you created your AWS account, you need to create a user with access to the Amazon Rekognition service. It is not a good practice to use your root account. So go to IAM service and create a user, then attach the AmazonRekognitionFullAccess policy to that user. For this tutorial, we use the full access policy, but you can always fine-grain the access policy by yourself. You also need a policy to access and put objects to your S3 bucket. Use the following policy.
{
    "Version": "2012-10-17",
    "Statement": [
        {
            "Sid": "VisualEditor0",
            "Effect": "Allow",
            "Action": [
                "s3:PutObject",
                "s3:GetObject",
                "s3:ListBucket"
            ],
            "Resource": [
                "arn:aws:s3:::<your bucket>/*",
                "arn:aws:s3:::<your-bucket>"
            ]
        }
    ]
}
Once you have created your user, select the user from the IAM console, and create the programmatic credentials (Access Key and Secret Key). Now log out and log back in to use the service through the console.
Amazon Rekognition on Console
First of all, let’s take a closer look at the service using the AWS console. Go to your account and search for Rekognition in the services, select it and go to object and scene detection. Upload one image and see the analysis on the right side of your screen.

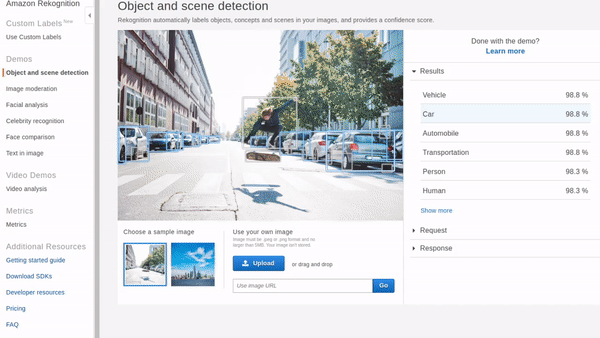
As we can see, the results are impressive! The service found that this picture contains a city, a road, humans, etc. Proper tags for our image. Let’s say we are saving pictures in our app; we can use this service to assign tags on those images to be searchable. Also, we can see that the service detected the humans in the picture with MBRs (minimum boundary rectangles). Lastly, we can select the Response section, under the results, to see the format of the response we would take if we call this service programmatically.
Now let’s try the facial analysis feature. Go to Facial analysis and upload an image.
The service is incredible; it thinks I am 23! I like that service! Unfortunately, I am NOT 23, but the rest of the results are pretty nice. It detected that I am not smiling (yes, I am a joyful person), that I wear glasses, and my eyes are open. There are so many applications with this information. Also, I have to mention that this is not the optimal angle either, and it did a pretty good job. Now let’s move on to the programmatic requests.
Amazon Rekognition on Python
In the previous section, we saw how to use the Image and Scene recognition and also the Facial Analysis. Now we learn how to ask Amazon Rekognition programmatically. We use the boto3 python package to upload our image to S3 and then to use Rekognition. I split this section into two subsections, the method to upload images to S3 and the Amazon Rekognition calls. That way, you can get the code for the image analysis and add it to a lambda with an S3 trigger.
Uploading images to S3
This is a straight forward method that we have also used in previous posts.
I uploaded using the script above the two images I used on the examples above.
Image analysis with Amazon Recognition
Once I uploaded my images to S3, I start creating the function to perform the object detection. Still, then I realized that Alex Casalboni has a very organized gist that showcases Amazon Rekognition with boto3. You can find the gist here
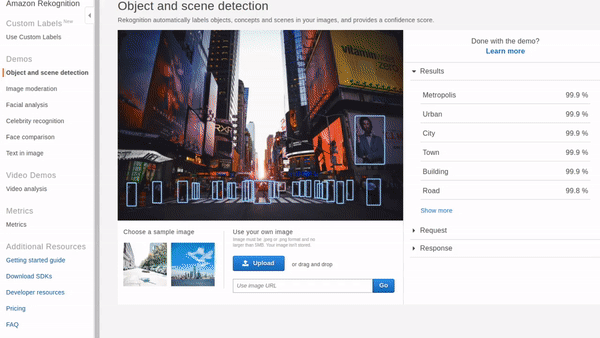
labels = detect_labels(BUCKET, "object_detect_photo.jpeg")
for label in labels:
    print(f"{label['Name']} - {label['Confidence']}")

>> Metropolis - 99.90679931640625
>> Building - 99.90679931640625
>> Urban - 99.90679931640625
>> City - 99.90679931640625
>> Road - 99.8531723022461
>> Asphalt - 99.6214828491211
>> Tarmac - 99.6214828491211
>> Person - 99.44196319580078
>> Human - 99.44196319580078
>> Downtown - 99.38468170166016
In the response, there is also the list that contains the MBRs and even the Parents of the referenced Labels. For example, label Metropolis has parents Urban, Building, and City.
Now, let’s take a look at the facial analysis.
labels = detect_labels(BUCKET, "facial_photo.jpg")
for label in labels:
    print(f"{label['Name']} - {label['Confidence']}")

>> Human - 99.9774398803711
>> Person - 99.9774398803711
>> Face - 99.9774398803711
>> Accessory - 98.76298522949219
>> Accessories - 98.76298522949219
>> Glasses - 98.76298522949219
>> Beard - 98.3719482421875
Again, we have the features and the confidence; we also have the MBRs in the response and the parents of the features.
Conclusion
We have just scratched the surface of Amazon Rekognition, there is so much more to this service, and we will explore all of the features! For now, we just got a flavor of what Amazon Rekognition can do. In the bottom line, I liked the service; it was easy to use and easy to integrate with your app. It is not very expensive, and it comes with a lovely free-tier option.
Well, that is it for today, folks. I hope you find that article interesting. If you have any questions, suggestions, or notices, please let me know in the comment section below or at my Twitter account @siaterliskonsta. Make sure to check out my earlier post about Amazon Kendra and other AWS related ones. Until next time, take care!
Resources
- https://gist.github.com/alexcasalboni/0f21a1889f09760f8981b643326730ff – Alex Casalboni’s git with really easy to use examples of Amazon Rekognition. It is on Python 2 but you can easily change it to Python 3.
- https://github.com/aws-samples/amazon-rekognition-engagement-meter – Examples from AWS labs for Amazon Rekognition
- https://github.com/aws-samples/amazon-rekognition-custom-labels-demo – Examples from AWS labs for using custom labels with Amazon Rekognition
- https://aws.amazon.com/rekognition/ – Amazon Rekognition main page
- https://aws.amazon.com/rekognition/pricing/?nc=sn&loc=4 – Amazon recognition pricing page
- https://boto3.amazonaws.com/v1/documentation/api/latest/reference/services/rekognition.html – Boto3 Amazon Rekognition