
In previous posts, we explored Amazon SageMaker’s AutoPilot, which was terrific, and we learned how to use your own algorithm with Docker, which was lovely but a bit of a fuzz. In this post, we will see how easy it is to bring your own algorithm using the script mode in SageMaker. Again we will use the new SageMaker Studio!
Let’s take a look at the resources we will use how much it will cost this tutorial:
- AWS Level: 300
- Total Cost: Let’s say 1$ (with no Endpoint deployed)
- Amazon SageMaker Notebook: ml.system for 24 hours -> 0.00364 x 24 -> 0.087$ + ml.t3.medium for 12 hours -> 0.7$ = 0.8$
- Amazon SageMaker Training instance: 225 seconds in ml.c5.2xlarge -> 0.476 x 0.07 = 0.03
You can find the code of this post here: https://github.com/siakon89/machine-learning/tree/master/sagemaker/fashion-mnist-byom
Prerequisites
The only thing we need is a dataset. I chose the popular Fashion MNIST dataset.
We will download Fashion MNIST from Keras datasets as follows:
Let’s take a look at the data we just download:


Pre-process dataset
We have to make some adjustments to our data for our model.
First, we normalize the images to 0-1. Fashion MNIST images are 28×28 arrays with values from 0 to 255, with 0 being color black and 255 being color white. We divide the array with 255 to bring its value to [0, 1] (line 4-5).
We also need to transform our data from 28×28 to 28x28x1 for our model (line 8-9)
Finally, we one-hot encode our labels (line 13-14)
Building the model
We will use Convolutional Neural Networks (CNNs) to solve that classification problem. Construct a relatively simple CNN as follows:
For this model, we used a pretty simple CNN network with three Conv2D layers, one 64 and two 32, both with kernel size 3×3 and activation function, our favorite ReLu. Below is a summary of the model.
_________________________________________________________________
Layer (type)                 Output Shape              Param #
=================================================================
conv2d_28 (Conv2D)           (None, 26, 26, 64)        640
_________________________________________________________________
conv2d_29 (Conv2D)           (None, 24, 24, 32)        18464
_________________________________________________________________
conv2d_30 (Conv2D)           (None, 22, 22, 32)        9248
_________________________________________________________________
flatten_12 (Flatten)         (None, 15488)             0
_________________________________________________________________
dense_12 (Dense)             (None, 10)                154890
=================================================================
Total params: 183,242
Trainable params: 183,242
Non-trainable params: 0
_________________________________________________________________
Setting up SageMaker
In the same Jupyter Notebook, we upload our data to S3 and “let SageMaker” train our model. First of all, we need to transform our data in a binary format; we use NumPy. After the transformation, we upload the files into SageMaker’s S3 bucket.
Train the model
To train the model, first, we need to bring the model code in an acceptable format by SageMaker. To do that we need to have in mind two things:
- SageMaker will get a python file as input, and it will run it with arguments
- The training of the model will be performed in another instance, so we need to get the data from S3
Script
Given the above, we first need to accept the arguments that SageMaker uses in our script, and secondly, we need to read the data from S3. We create a new file named model.py (you can use whatever name you want)
- Line 26-40: Set up the argparse to accept specific arguments. Set learning rate, epochs, and much more through the command line, and the command line translates into arguments in SageMaker Estimator
- Line 42-45: Parsing the arguments to variables
- Line 47-49: reading the data from local. Wait… local? Yes, SageMaker copies the data that you have set in the parameters in a folder specified by you; in our case, args.train will hold our files fo training.
- Line 12-21: reading the files with NumPy
- Line 51-73: This is the model defined above
- Line 75-77: Evaluating model
- Line 79-80: Saving the model in args.model_dir
SageMaker Estimator
After setting the model.py file, we need to set the Estimator for the script mode. We will use the built-in TensorFlow estimator from SageMaker to use the script mode.
- Line 1: Is the directory to save the final model
- Line 2: is the instance where we will train our model. Here you can find a list with all available instances in SageMaker, but for the GPU ones, you will have to increase your limit through AWS Support.
- Line 3: are the hyperparameters/arguments for the script
- Line 5-16: This is the Estimator that will spawn the instance to train the model
- Line 6: This is our script we created earlier
- Line 7: The type of instance to train the model
- Line 8: The number of instances to train the model
- Line 9: The folder to save our model
- Line 11: The role of SageMaker needed to create everything. With this, you can run SageMaker from local also.
- Line 12: The name of the training job that we will search in the Experiments section
- Line 13: The version of Tensorflow. As for today, SageMaker supports up to 1.15 (I would love to see 2.0 with the new TripletSemiHardLoss add on)
- Line 14: The python version
- Line 15: Enable script mode
- Line 18: Train the model with the generated inputs. Something we declared above, it is the train and the test location in S3
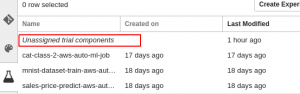
You can monitor the progress of your training job either in Jupyter Notebook or at the Experiment section. Remember when we used the name tf-fashion-mnist in the Estimator? Well, this is how we find the training job. Double-click “Unassigned trial components,” then find the name of the job, left-click and select “Open in trial details.” Select the section Metrics to see the evaluation score.


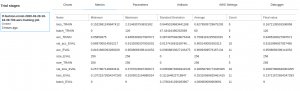
Furthermore, remember Line 76 on model.py, where we printed the evaluation score of the model?
Test MSE : [0.2660780865192413, 0.9116]
- Loss: 0.26
- Accuracy: 91.1%
Well, that is pretty good, we can certainly do better, but for now, we are set. We can see that the monitoring of our model is a bit tricky; in future posts, I will take a closer look at the new debugger for SageMaker studio.
You can find the model in S3 and deploy it manually or by using the deploy endpoint command from SageMaker.
Conclusion
The script mode in SageMaker is definitely making the whole process of “Bring our own model” easier. You have everything set up out of the box, the only thing you have to do is to pass the arguments of the Estimator. In addition, SageMaker Studio makes the monitoring of the training job a bit easier, and the metrics are a very nice addition. On the other hand, there is limited support for the framework versions, for example, I would like to see Tensorflow 2.0 be available in the script mode. Furthermore, it was hard to set up the Local mode to train my model. The whole initialization process usually takes 2-4 minutes in order to start training your model, and I would like to test my model or run it locally first.
Well, that is it for today folks. I hope you find that article interesting. If you have any questions, suggestions or notices please let me know in the comment section below or at my Twitter account @siaterliskonsta. Make sure to check out my earlier posts about SageMaker AutoPilot and Serverless Data Lake. Until next time, take care!