
In a previous post, we took a closer look at Amazon Rekognition on Amazon Console; if you missed it, I strongly recommend going back and read it since we will follow pretty much the same way to tag images programmatically. In this post, we see how to create a serverless app and automatically tag newly uploaded images. We use the following AWS services.
- DynamoDB
- Lambda
- S3
To create and deploy the app, we use the Serverless Application Model (SAM). We first create a Lambda that will extract the labels from an image, and then we make a trigger where it takes the pictures and uses Rekognition to generate the tags. Lastly, we save the results on DynamoDB, and we keep the name of the image, the label, and the confidence, the last one optional.

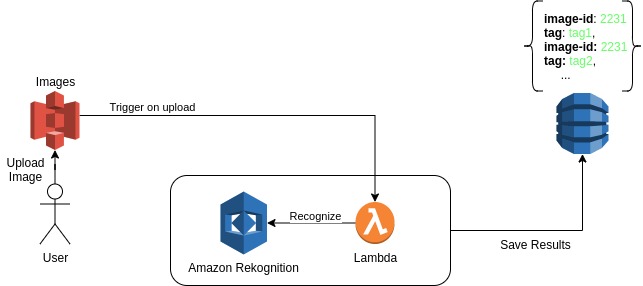
In the picture above, the architecture of the app is depicted; based on that schema, we create our serverless app using the Serverless Application Model. You can find the code of the project here.
- Difficulty level: 200
- Cost: Free (Covered by AWS Free Tier). Remember to delete the stack after you completed the tutorial.
Without further ado, let’s begin.
Creating SAM template
First of all, we create a Cloudformation stack using SAM to deploy our app; that way, we will have full control of the spawned resources. First of all, let’s take a quick look at the SAM template.
I know that looks confusing, but once we explain everything, you will see it is straightforward. We go line by line to fully understand the template.
- Line 6-12: Definitions for the Lambda Function
- Line 14-59: Defined resources
- Line 16-19: We create an S3 bucket to upload our images
- Line 22-36: We create a DynamoDB table to save the results from Amazon Rekognition
- Line 27-31: We define the schema for the table
- Line 32-36: We define the type of attributes
- Line 40-59: We define our Lambda function
- Line 43-44: This is where the code of the project is and the lambda handler
- Line 45-47: These are the env variables of the Lambda
- Line 48-53: These are the attached policies
- Line 54-59: This is the trigger event that will go to S3 bucket. BEWARE! I haven’t filtered the image formats, so anything that will go into this bucket, the Lambda will try to extract labels. If you want to limit the files that will go for label detection, you can add a bucket policy that will only accept the image formats. Here is a tutorial
- Line 61-70: We define the output of the SAM template to have easy access to resources ARNs
Creating the Lambda
Now that we have created the SAM template, we will need to provide the code for the Lambda function. Remember the lines 43-44, where we defined the code of the project. Create a folder src and inside, create a file named recognize_image.py this will be our lambda handler. Inside this file, paste the following code.
This function gets the parameters from the trigger (line 13-14) and calls Amazon Rekognition to detect the labels. I have forced the parameters (line 24-25) for the maximum number of labels and the confidence threshold, but you can parameterize those values any way you want. Once I have the labels, I insert them to our newly created DynamoDB table. Notice that I pass the name of the table as an environment variable.
Well, that’s pretty much it! We have created our app. Now we have to deploy it and test it.
Deploying the stack
Finally, to deploy the stack, you will need to run a few commands. I usually create a deploy.sh file with the following commands. You will only need a bucket to save the template.yaml, and you need read-write access to this bucket (Line 2, –s3-bucket argument).
The stack is now deployed, and you will see at the end the ARNs and the bucket name of our app, we use the bucket name to upload the files in the next section, so grab it for now.
Key                 ImageBucket
Description         The bucket to save the images
Value               image-bucket-**********   <--- This
Uploading files
As a next step, all we have to do is to upload images into the bucket. We will use the script from the previous tutorial to upload files to our bucket.
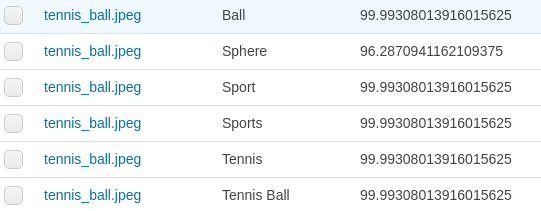
Once we upload an image using the above script, we can see that in DynamoDB table, we have multiple entries for the image, one for each label accompanied by the confidence of the result. Now we can execute queries on DynamoDB and filter images by their labels.

Deleting everything
To delete everything you can either go to your AWS Console, select CloudFormation service and delete the stack manually or simply run the following command.
aws cloudformation delete-stack --stack-name imageTagging --profile <your profile>
Again you are not obligated to use the profile argument if you are using your default profile. We defined the stack-name when we deployed our stack.
Conclusion
Well, that is it for today. As you can see, it is effortless to create a serverless auto-tagging app for your system. Let me know if you have any questions and/or suggestions in the comment section below or at my Twitter @siaterliskonsta. See you at the next one!